Commercial Ice Machine Troubleshooting Guide
- Aug 17, 2025
- 14 min read
When your commercial ice machine suddenly quits on you, panic can set in fast. But before you pick up the phone for a service call, a few basic checks can often solve the problem right then and there. Things like power, water supply, and proper ventilation are the usual suspects.
Running through these initial troubleshooting steps might just get you back up and running without costing you a dime.
Your First Diagnostic Checks
Before you start tearing into complex components, let's cover the fundamentals. You’d be surprised how many "broken" machines are just suffering from a simple oversight that can be fixed in minutes.
This first diagnostic sweep is your best defense against unnecessary downtime and a hefty repair bill. Think of it as a pre-flight checklist. We're going to systematically inspect the three pillars of ice production: power, water, and environment. Ignoring these is one of the most common mistakes I see people make.
Confirming Power Supply
It might sound obvious, but you have to start here. A machine that won't turn on might not be broken at all.
Check the Plug: Is the machine plugged in securely? It’s not uncommon for vibrations from the unit or staff cleaning around it to loosen the plug just enough to cut the power.
Inspect the Breaker: Head over to your building's circuit breaker panel. Find the breaker for the ice machine and check if it's been tripped. If it's in that middle or "off" position, flip it completely off, then switch it back on.
Test the Outlet: If the breaker looks good, the outlet itself could be the issue. Unplug the ice machine and plug in something you know works, like a phone charger or a small lamp. If that doesn't power up, you've got an electrical problem, not an ice machine problem.
A tripped breaker accounts for a shocking number of service calls. This quick five-minute check can save you a world of hurt.
Verifying Water Flow
It’s a simple equation: no water, no ice. An interruption in the water supply will bring production to a dead stop, even if the machine sounds like it’s running.
I've seen it a hundred times in busy kitchens: a staff member is cleaning or moving supplies and accidentally bumps the water shutoff valve, closing it. It’s always the first thing to check because it’s such an easy fix.
Find the water line that runs to your machine and trace it back to the shutoff valve. Make sure that handle is turned to the fully open position. If the valve is open but you still think there's a flow problem, the water filter is your next stop. A clogged filter is a classic culprit for restricting water flow, and it's a routine maintenance item that's easy to forget about.
Sometimes, the clues are more subtle. The infographic below shows how something as minor-looking as condensation can point to bigger issues inside the machine's environment.
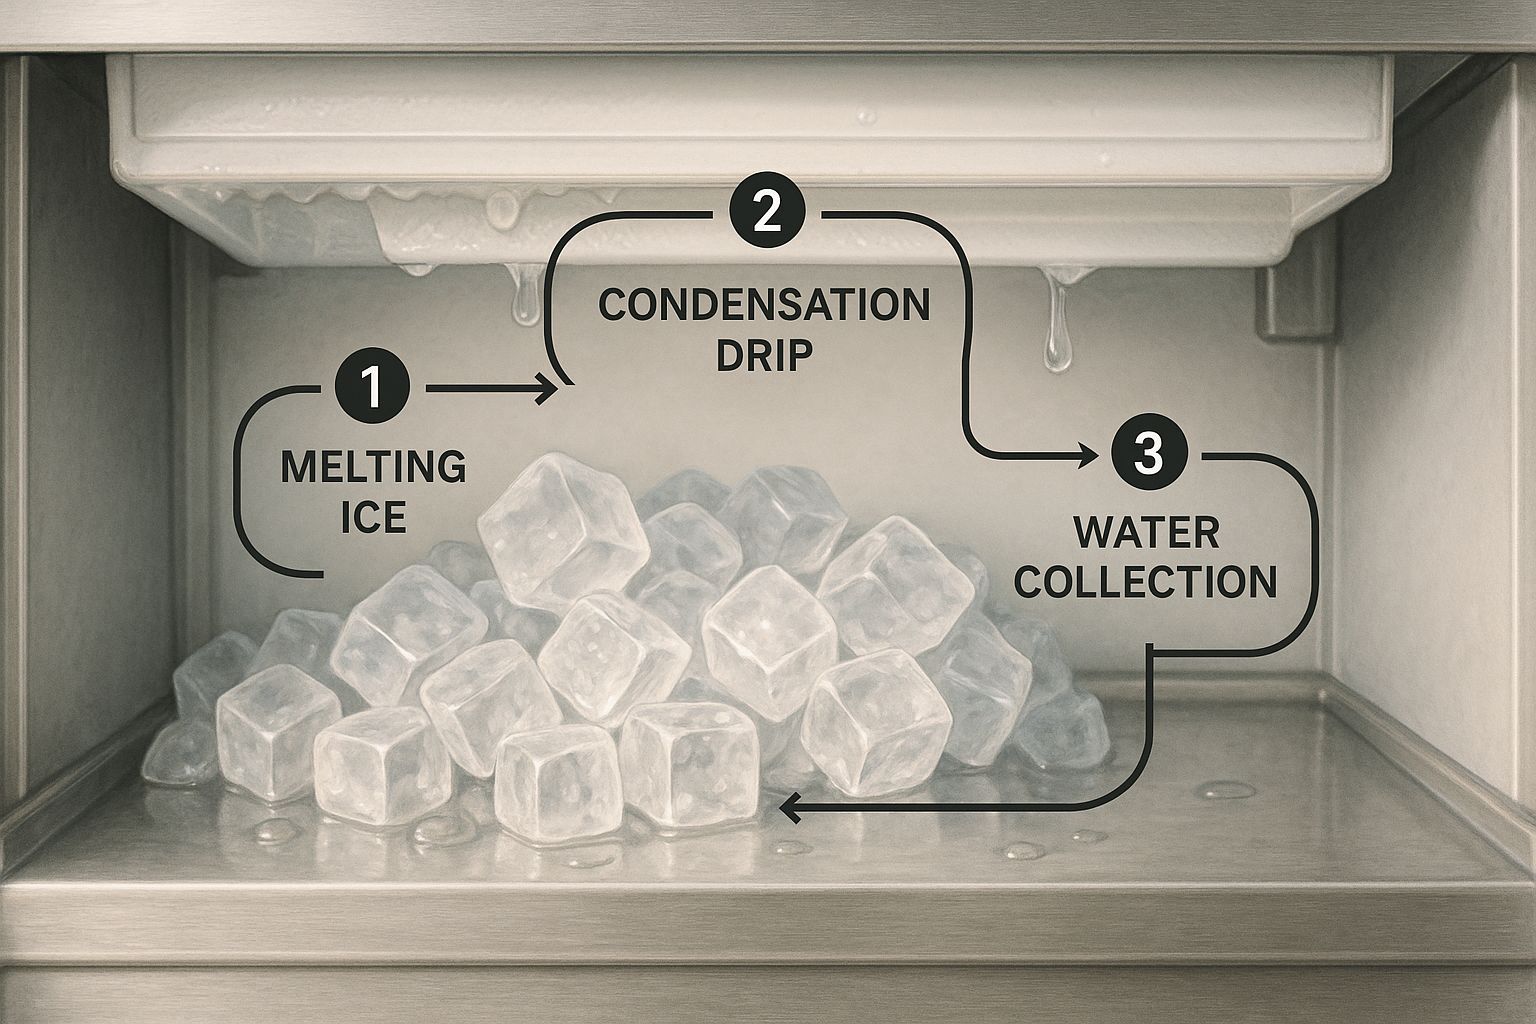
As you can see, things like internal condensation or premature melting can be a sign that something is off with the temperature regulation or the refrigeration cycle, which we’ll get into later.
To help you run through these first steps quickly, here's a simple checklist to keep handy.
Quick Diagnostic Checklist for Common Ice Machine Issues
This table breaks down the most common symptoms and gives you a quick action to take before calling for service. It’s a great way to rule out the simple stuff first.
Symptom | Potential Cause | Quick Check or Action |
|---|---|---|
Machine won't turn on | No power | Check if it's plugged in; inspect the circuit breaker; test the outlet. |
Making noise, but no ice | No water supply | Ensure the water shutoff valve is fully open. |
Low ice production | Clogged water filter | Check and replace the water filter if it's dirty or past its service date. |
Unit feels hot or shuts off | Poor ventilation | Ensure at least 6 inches of clearance around all vents; clean any dust from the condenser coils. |
Ice is thin or incomplete | Water supply issue | Verify adequate water pressure and check the water filter for blockages. |
Running through these checks will resolve a surprising number of issues. If you've tried all of them and the machine is still on the fritz, then it's time to dig a little deeper or call in a pro.
Solving Water Flow and Filtration Problems

If your ice machine is acting up, the first place I always look is the water supply. Think of that water line as the machine’s lifeblood. Any interruption or contamination is going to show up in your ice bin—or lack thereof. It can cause slow production, weirdly shaped cubes, or just a complete shutdown.
These issues are incredibly common out in the field. While a lot of people jump to thinking it’s a refrigeration problem—and that accounts for over 40% of service calls—a huge 25% of failures are actually due to simple water supply or filtration blockages. It really drives home how critical clean, flowing water is for these machines. You can dig into more of these commercial ice maker market trends from Cognitive Market Research if you're curious.
Ignoring your water quality is just asking for trouble. The minerals in hard water, especially calcium and magnesium, build up over time and create a stubborn deposit we call scale. This stuff is the silent killer of ice machine components.
Spotting the Signs of Poor Water Quality
You don't need to be a technician to see the warning signs of a water problem. In fact, your ice cubes will usually tell you exactly what’s going on.
Cloudy or Opaque Ice: Great ice is crystal clear. If your cubes look milky or white, it’s a dead giveaway that there are too many minerals in your water. It can also mean air is getting trapped because of a slow freeze cycle.
Misshapen or Small Cubes: When scale builds up on the evaporator plate, water can't flow evenly across the grid. The result? Small, incomplete, or just plain weird-looking ice.
Reduced Ice Production: This one’s simple. A clogged filter or scale-choked line restricts water flow. If the machine doesn't get enough water, it can't make enough ice.
If you see any of these symptoms, your first thought should be the water circuit.
I once had a restaurant owner who was convinced his machine's compressor was shot because production had dropped by half. I took one look at his setup, and the first thing I checked was the water filter. It hadn't been changed in over a year. A new filter and a few hours later, his machine was back to cranking out ice at full capacity.
Diagnosing Clogged Filters and Scale Buildup
Your first stop should always be the water filter. It's the easiest thing to check and often the root of the problem. Most commercial filters have pressure gauges on the inlet and outlet sides. If you see a big pressure drop between the two, you’ve found your clog. Time for a new filter.
No gauges? No problem. Just check the manufacturer's recommended replacement schedule—it's usually every six months—and stick to it like glue.
If the filter looks good, the next culprit on the list is scale buildup inside the machine. This is where you might need to get your hands a little dirty.
Evaporator Plate: Take a close look at the grid where the ice actually forms. See a chalky white or yellowish residue? That’s scale. It needs to be cleaned off with a proper, nickel-safe descaling solution.
Water Inlet Valve: Scale can jam this valve, preventing it from opening or closing correctly. This can either starve the machine of water or cause it to leak constantly.
Water Pump and Tubing: Hard water deposits can choke the entire system, restricting flow and putting a ton of strain on the pump motor.
Regular descaling isn't just a suggestion; it’s a must. It’s a core part of any good preventative maintenance plan that keeps your machine running efficiently and helps you avoid much bigger, more expensive problems down the road. It’s the same logic we apply to refrigeration systems—a little care now prevents a crisis later. For more on that, check out our guide on how regular refrigeration maintenance can prevent major food loss.
By staying on top of water flow and filtration, you’ll ensure a steady supply of clean ice and get a whole lot more life out of your equipment.
Troubleshooting Refrigeration and Temperature Issues

Your ice machine is humming along, but the bin stays stubbornly empty. Sound familiar? When this happens, the refrigeration system is almost always the prime suspect. Digging into this part of your ice machine can feel a little intimidating, but you'd be surprised how many common issues are straightforward enough to diagnose on your own.
The refrigeration cycle is the heart of your machine—it’s what pulls the heat out of the water to actually create ice. If that process falters, you'll start seeing the symptoms: the machine runs forever, the ice comes out thin and soft, or you get no ice at all. Before you pick up the phone for a service call, a few simple checks can point you in the right direction.
The Impact of Ambient Temperature
One of the biggest culprits, and one that’s often completely overlooked, is the room itself. Commercial ice machines are surprisingly sensitive to the air temperature around them. A sweltering kitchen or a poorly ventilated storage closet forces the refrigeration system to work way harder than it should.
Your machine has a sweet spot it's designed to work in, usually somewhere between 50°F and 100°F. Push it past that upper limit, and you’ll see ice production plummet. In some cases, the unit will just shut down to protect the compressor from burning out.
I’ve walked into kitchens where the ice machine was crammed right next to a deep fryer and a convection oven. That machine never stood a chance. Simply moving it or improving the ventilation made an immediate, massive difference in its performance.
Start with a quick visual check. Is there enough clearance? You need at least six inches of open space around all the air vents so the machine can breathe—pulling in cool air and pushing out hot air.
Inspecting Condenser Coils
Think of the condenser coils as your machine's radiator. They’re responsible for releasing all the heat absorbed from the refrigerant. Over time, these coils become magnets for the dust, grease, and general grime floating around a commercial kitchen. When they’re caked in gunk, that debris acts like a blanket, trapping heat inside.
This doesn't just send your energy bills through the roof; it puts a ton of strain on the compressor and the whole system. Cleaning the condenser coils is probably the single most effective maintenance task you can do.
How to Safely Clean Condenser Coils:
Kill the Power: First thing's first. Unplug the ice machine or shut off its circuit breaker. Never work on it while it's live.
Find the Coils: They’re usually behind a side or back panel and look a lot like the radiator in a car.
Brush Gently: Use a soft-bristled brush to gently wipe away loose dust. Always brush in the same direction as the fins so you don't bend them.
Vacuum Up the Rest: A vacuum with a brush attachment works great for getting any stubborn particles left behind.
Break Out the Cleaner (If Needed): For serious grease buildup, a can of commercial-grade, non-acidic coil cleaner will do the trick. Just spray it on and follow the product's directions.
Making this a regular habit is a cornerstone of reliability. If you want to build a solid upkeep routine, check out these essential commercial ice machine maintenance tips for reliable performance.
Other Key Refrigeration Checks
While some problems are best left to a certified technician, there are a few other warning signs you can spot yourself. Take a look at the evaporator plate where the ice actually forms. If you see a thick, uneven layer of frost, that could point to an issue with refrigerant levels or the harvest cycle.
Another quick check is the air coming from the condenser fan. It should feel warm. If it’s cool, or conversely, scorching hot, you’ve likely got a problem brewing inside.
Diagnosing Electrical and Control Panel Failures
When your commercial ice machine suddenly goes dark or starts flashing cryptic error codes, it's natural to assume the worst. But before you call for an emergency service, take a breath. Most electrical issues and control panel glitches are more straightforward than they seem.
Modern ice machines are getting smarter, with digital screens and touch controls becoming the norm. While these features make them easier to operate day-to-day, they also introduce a new layer of complexity when things go wrong. Knowing your way around these systems is half the battle. If you're curious about the latest tech, you can check out some market insights from Business Research Insights.
The most obvious sign of trouble is a completely dead machine. If you've already checked that the outlet has power and the breaker hasn't tripped, then the problem is likely inside the unit—usually with the internal wiring or the main control board.
Decoding Control Panel Errors
A blinking light or an error code on the display is your machine's way of telling you exactly what's wrong. Don't just ignore it and hope it goes away. These codes are your single best clue for tracking down the source of the problem.
Grab the Manual: Every code corresponds to a specific issue, all of which are laid out in the user manual. Common codes will point you toward high-pressure faults, water level sensor errors, or problems with the harvest cycle.
Try a Power Cycle: Sometimes, a simple reboot is all it takes to clear a temporary glitch. Just turn the machine off at the breaker, give it a full minute, and then power it back on.
Look for Sensor Problems: A frequent culprit is an "ice thickness probe" fault. Take a look at the probe. If it's caked in mineral scale, it can't sense the ice properly, which triggers an error message.
If the control panel itself is completely dead, that points to a more serious issue, like a failed power supply board or a disconnected wire inside the machine.
Before you start pulling things apart, always do a quick visual check of the control board. Look for any obvious burn marks or damaged components. A quick glance can sometimes save you a whole lot of diagnostic time.
Testing Critical Sensors and Components
Beyond the obvious error codes, a few key sensors can fail and cause chaos without ever displaying a clear fault. The water level sensor, for instance, is what tells the machine when the water trough is full. If that sensor goes bad, your machine might overflow or not fill with water at all.
You can often test these components with a multimeter to check for continuity, but this is where you need to be honest about your own skills. If you're not comfortable working with live electrical components, this is the time to call in a professional. One wrong move can cause more damage or, worse, create a serious safety hazard.
Remember, even small electrical inefficiencies can add up on your utility bill. Keeping your machine running smoothly is a big part of managing your operational costs. You can learn more about this by exploring how ice machine efficiency can impact your bottom line.
How Your Kitchen’s Environment Affects Your Ice Machine
An ice machine’s performance isn't just about what's inside the box. Where you put it plays a huge role in how well it runs and how long it lasts. Factors like the kitchen's ambient heat, the quality of your local water, and even the stability of your power grid can create a cycle of never-ending problems.
A machine fighting the heat and humidity in a coastal city has a completely different job than one in a dry, high-altitude town. Thinking about your machine's location isn't just an installation detail—it's one of the first steps in smart troubleshooting. A machine crammed into a hot corner of the kitchen is going to overwork its refrigeration system, leading to burnout and slow ice production.
The Impact of Heat and Airflow
Every commercial ice machine is built to work within a specific temperature range, usually between 50°F and 100°F. When the air around the unit climbs past that point, its ability to shed heat and make ice plummets.
Good airflow is just as important. The machine has to breathe—it pulls in cool air to chill its condenser and pushes hot air out and away.
Give It Space: Always leave at least six inches of clear space around all vents. It's a common mistake to see boxes or other equipment stacked right up against the machine, basically suffocating it.
Keep It Away From Heat: Placing an ice machine next to a fryer, oven, or high-temp dishwasher is asking for trouble. That constant external heat puts a massive strain on the compressor.
A hot, cramped space is one of the top reasons ice machines overheat and shut down. This is where you see how all your kitchen equipment works together as a system. To learn more, check out our post on why regular HVAC service is critical in food service settings and see the bigger picture.
Water Quality and Power Stability
Your location also determines the kind of water and power you get, and both directly hit your machine. If you're in an area with hard water—full of minerals like calcium and magnesium—you're going to see scale build up much faster. That scale can choke water lines, valves, and other internal parts, forcing you to descale it more often.
Your best defense is a maintenance plan that accounts for your location. If you know you have hard water, schedule descaling every quarter instead of twice a year. If your kitchen runs hot, make cleaning the condenser coils a monthly task. This turns reactive troubleshooting into proactive prevention.
The stability of the power grid is another big factor that changes from one region to another. Some areas deal with frequent voltage fluctuations. These power surges and sags can fry sensitive electronics like control boards and sensors. For example, in the fast-growing Asia-Pacific market, about 15-20% of service calls are tied to electrical supply problems, often caused by the variable power grids in expanding cities. You can dig into more of these global ice maker market trends from Metastat Insight.
When you understand the environment your machine is working in, you can get ahead of problems before they shut you down.
Common Questions About Ice Machine Troubleshooting
When you're in the middle of a busy service and the ice bin is suddenly empty, you don't have time to dig through a dense technical manual. You need answers, and you need them fast. We get it. That's why we've put together the most common questions we hear from restaurant and facility managers out in the field.
Think of this as your go-to guide for those panic-inducing moments. We’ll get straight to the point on the issues that can bring even the best-run kitchens to a halt.
Why Did My Ice Machine Suddenly Stop Making Ice?
This is, without a doubt, the most urgent call we get. The machine has power, but there’s no ice dropping. Nine times out of ten, the cause is surprisingly simple.
Before you do anything else, check the water supply. It sounds obvious, but a staff member could have accidentally knocked the shutoff valve closed during cleaning. Another common culprit is a clogged water filter, which essentially starves the machine of the water it needs to make ice.
If the water is flowing fine, your next stop should be the sensors. The ice thickness probe or the water level sensors can easily get coated in mineral scale, especially if you're in an area with hard water. When that gunk builds up, the machine gets a false reading and shuts down the ice-making cycle, thinking its job is done when the bin is still empty.
What Do These Strange Noises Mean?
Every ice machine has its own rhythm—the familiar whir of the fan, the click of the solenoid, and the gentle crash of ice hitting the bin. But when new, alarming sounds start up, your machine is trying to tell you something is wrong.
Loud Grinding or Squealing: This is a red flag. It often points to a major component on its way out, like the water pump motor or the condenser fan. Shut the machine down immediately to prevent a small problem from turning into a catastrophic failure.
Constant Clicking: Hear a repetitive click-click-click? That could be a bad relay or a control board that's trying—and failing—to kickstart a cycle.
A Loud Thud During Harvest: A gentle drop is normal. A loud, jarring bang often means the ice slab is sticking to the evaporator plate, usually because of scale buildup.
Don't ever ignore a new noise. It’s your machine’s earliest warning sign. Catching it early can be the difference between a quick adjustment and a full-blown component replacement.
Why Is My Ice Cloudy or Soft?
Perfect ice should be crystal clear, hard, and slow to melt. If your cubes are coming out cloudy, mushy, or just don't seem fully frozen, the problem almost always circles back to two things: water quality or the refrigeration cycle.
Cloudy ice is a classic sign of impurities and dissolved minerals in your water. Your best defense here is a high-quality water filtration system designed specifically for ice machines.
If the ice is soft or "wet," it's likely a refrigeration issue or a problem with the harvest cycle. The machine might be releasing the ice from the evaporator plate too soon, before it has a chance to freeze solid. This can happen when the machine is dirty or needs calibration. It’s the same core principle as your other refrigeration units; consistent upkeep is everything. We dive deeper into this in our guide on how often you should service your walk-in freezer.
Dealing with a persistent ice machine headache? The certified technicians at Putnam Mechanical LLC have the experience to diagnose and fix the problem fast. We offer same-day emergency service to get your operations back on track without delay. Contact us today for reliable and transparent commercial refrigeration repair at https://pmechanicalfl.com.